|
Erosion control & slope stabilization
Landslides,
Debris
flows, Creep, Slumps
This is just an introduction and an overview. There are
many things that a property owner or a general contractor
can do to reduce the chance of earth movement before it
happens, or to mitigate it after the fact.
If you're looking for some ideas to deal with water
erosion (ocean waves, rivers & streams
washing away or undercutting banks, levees, etc.) then you
might want to also look at our flood
control page.
Beyond these pages, we encourage you to expand your
search. There are great websites (especially government
sites) and books that offer a much more comprehensive
treatment of a complex topic than we do. But
there's no substitute for getting a qualified &
licensed engineer, architect, or geologist on site,
especially if safety or protection of property is
at stake.
Slope failure (or "mass wasting") can be described as
downslope movement of soil or rock debris. It can be slow
and gradual (creep), or sudden (slumps, debris flows, and
landslides).
Gravity is always at work on a slope. A "stable
slope" can be broadly described as being about
30 degrees or less (angle of repose) and possessing a
solid footing at its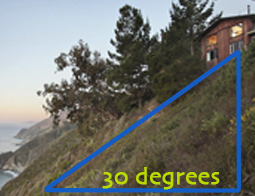 bottom. A slope of more than 30 degrees can be stable, and
one less than that can be unstable. Factors like a lack of
vegetation, soil composition & compaction, moisture,
surface friction, presence of rocks or boulders, etc. can
all quickly contribute to slow movement ("creep") or
sudden collapse.
There are a variety of other things that can make a slope
unstable or cause it to move. Water results in saturated
soil and rapid erosion. This is the most common cause of
failure. Heavy rains, a backed-up culvert, a broken
underground water main can all contribute to a slope
failing within hours, through lubrication and liquifaction
of the soil and by increasing the weight of the soil
dramatically.
Fires can be disastrous to slope stability. They burn off
the vegetation and kill the roots that hold the soil
together. Enhanced flooding may result because the heat
from the blaze can scorch the bare soil to a hard glaze
("burn scar") that rainfall just sheets off - resulting in
fierce flow volume & velocity.
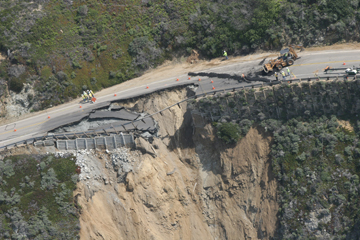
Other causes of slope failure can include heaving
(the cycles of wetting &
drying, especially with clay-rich soils), or
freezing and thawing; earthquakes;
vibration from heavy nearby construction or
traffic; and overloading the top
of the slope, such as building a house or a
high-traffic road too close to the
edge.
Among man-made causes, backcutting the foot of the
slope (or failing to
ensure its adequate drainage, allowing it to
become oversaturated &
unstable) is perhaps the most common. It's what we
do when we build roads or houses at the bottom of a slope,
and it's like pulling an orange from the bottom of a pile
in the supermarket's produce section. Equally dangerous is
overloading the top of the slope (such as building houses,
condos, or roads) on the edge; their weight puts downward
pressure on the slope, and they contribute significantly
to rainwater runoff which can accelerate erosion.
Recognizing
instability:
Signs that a slope might be unstable or creeping include
cracks in asphalt or cement paving, leaning trees,
fenceposts, or utility poles (either towards or away from
the hillside); offset fence lines; and changes in
vegetation (suggesting the new presence of water).
If there's a structure (on the slope, at its top, or at
its bottom), signs of movement can include cracks or soil
moving away from the foundations, sticking doors and
windows, cracking concrete floors, sunken or down-dropped
spots in roads & driveways, broken water pipes, and
noticeable movement or separation of decks & patios in
relationship to the building.
Steps
to take:
Again, this page is just an overview. In some cases, it
can be a quick fix. In other cases, you can spend a lot of
time, effort, and money, including securing the services
of a professional engineer or geologist. And sometimes you
might be flogging a dead horse - the conditions may just
be impossible (see above photo). Some things to look into
doing can include:
- eliminating or redirecting sources of water that might
be overly saturating the soil;
- covering the slope with geotextile material;
- planting vegetation;
- terracing or benching the slope;
- installing lateral french drains or culverts;
- minimizing or eliminating elements that cause surface
erosion;
- using straw wattles or bales to break the velocity of
runoff & to catch sediment;
- stabilizing the slope with shotcrete or gunite, and
covering with wire mesh.
Equally important are redirecting flow sources to cut
down erosion & soil saturation, and stabilizing &
reinforcing the foot of the slope with retaining walls.
These are where sandbags can be helpful.
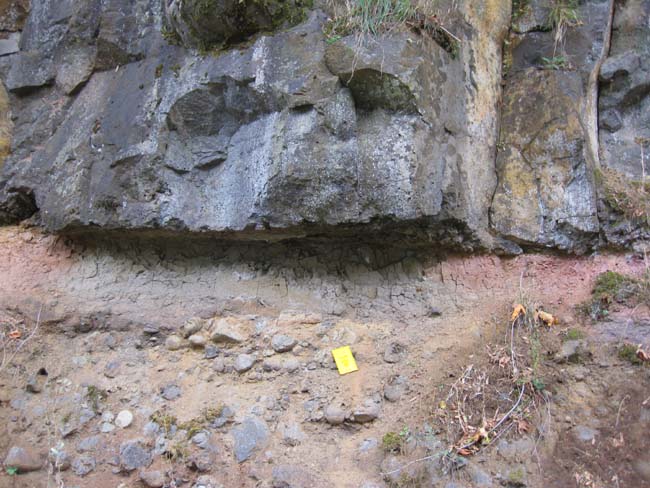 Overhangs:
On steep slopes here in the Southwest, the differentiated
strata that's so common can often result in hard rock
that's underlain by easily eroded softer rock. This can
result in a slope face in which hard rocks are hanging
over a concave face that's been eroded away. A vertical prop
wall can be built with sandbags, filling in the
concavity, and reaching up to support the overhanging
rocks. (Think of a filling in a tooth cavity - same
concept.) This can be secured in place with fencing, and
will help to prevent further erosion to the softer
underlying rock. Overhangs:
On steep slopes here in the Southwest, the differentiated
strata that's so common can often result in hard rock
that's underlain by easily eroded softer rock. This can
result in a slope face in which hard rocks are hanging
over a concave face that's been eroded away. A vertical prop
wall can be built with sandbags, filling in the
concavity, and reaching up to support the overhanging
rocks. (Think of a filling in a tooth cavity - same
concept.) This can be secured in place with fencing, and
will help to prevent further erosion to the softer
underlying rock.
As with all permanent placements of polypropylene bags,
the bags need to be covered from the sun or plastered
(mud's fine, so long as it doesn't wash away; geotextile
fabric or shotcrete is better) so UV rays don't cause the
bags to disintegrate. The 1600 hours that our bags are
treated for is good for only a couple of months, at best.
If moisture isn't a problem, burlap bags might be your
best bet. A more expensive (but higher insurance)
alternative would be to use premium bags, such as our
4-year heavy-duty black polypropylene bags or polyethylene
Durabags.
After
collapse:
If it's safe to do so, the priority should be to prevent
any further sliding or damage as much as possible. If
there's a building, road, or stream immediately downslope,
you can stack sandbags and try to create a wall or barrier
that will contain or divert mud, rocks, and any further
collapse of soil. If it's raining, doing this right away
will help prevent the fallen material from liquifying
& spreading, especially desirable if - again - there's
a house or a road.
If there's any significant water flow on the upper part
of the slope that might aggravate further collapse, it
might be possible to divert or redirect it with a sandbag
check dam (see below). Odds are, however, that it's best
at this point to evacuate & come back in a few days
with heavy machinery.
As mentioned above, support can be provided to
overhanging rocks that are at risk of coming down with a
vertical prop wall of sandbags, and eroded concavities can
be filled in with bags to help stabilize the slope &
prevent further erosion .
Diverting
and
redirecting flows:
If slopes have any purpose, it's to transport water
downhill to drainage systems (creeks, arroyos, rivers). It
can be concentrated (like in a gully) or it can be a sheet
of water covering the entire slope. Such surface flows can
be diverted by channeling the flow sideways to what can be
a "safe" drainage. Safe drainage can include pipes,
gullies, and swales (that allow backed-up water to seep
through absorbant soil) which are away from the slope
that's being protected.
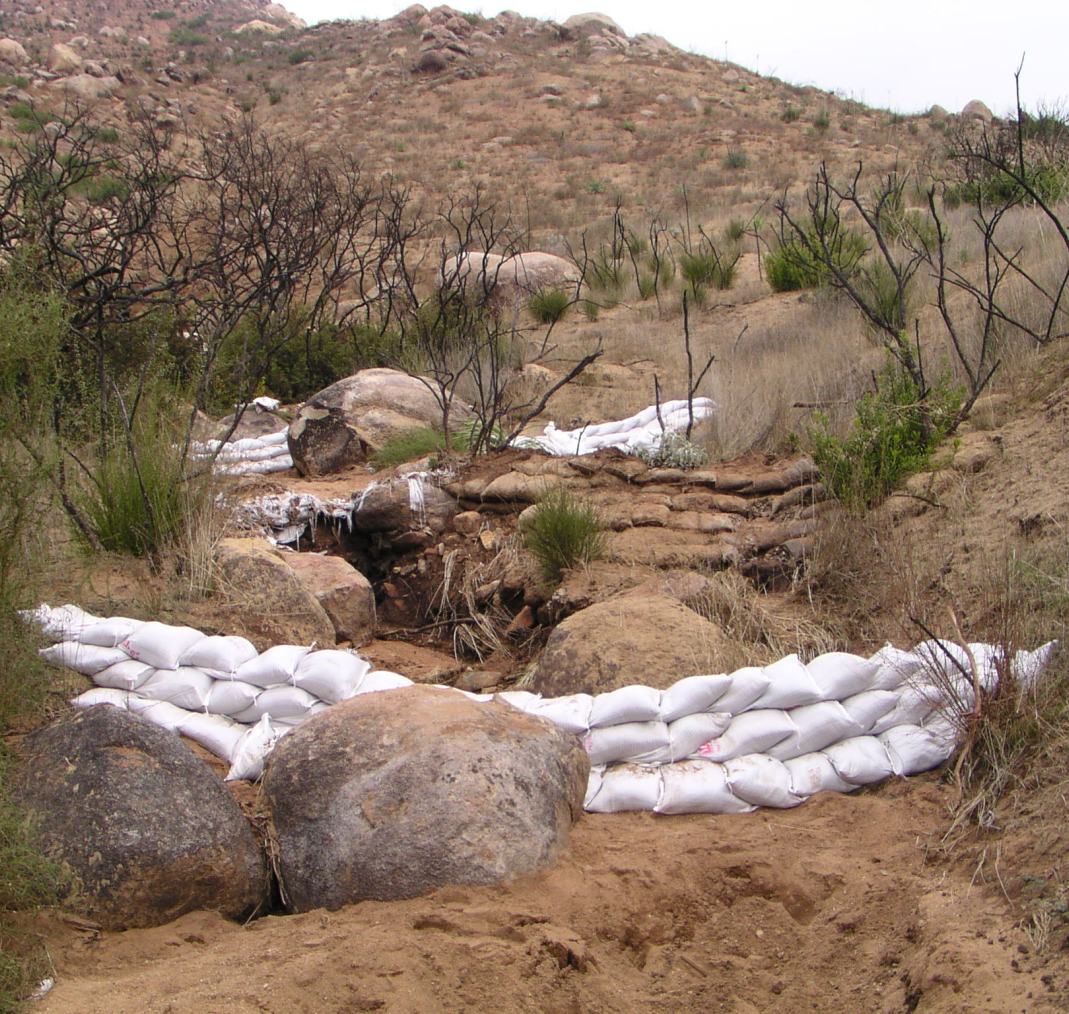
Diversion methods can include building channels with
rocks or sandbags, elevated berms, check dams (see photo)
and/or channels with rocks or sandbags. Berms and check
dams generally don't need to be any more than two feet
high, and don't necessarily require any digging (though a
bonding trench will help to prevent the bags from washing
away in large flows). Placing barbed wire between the
layers of bags, and/or covering them with wire mesh can
make them solid & resistant to collapse. Covering them
with earth, concrete, stucco, or a basic earth plaster
(clay-rich dirt, sand, and straw) will do the same, and
protect the bags from the sun's UV rays & abrasive
deterioration. If using bags, burlap bags may be a better
choice.
On the other hand, it's worth noting that slowing down
runoff can lead to ponding, which gives water a chance to
seep into the soil and undermining your barrier. Sandbags
that aren't sealed won't provide a 100% waterproof
barrier; water will seep through them, which helps prevent
ponding. It's a trade off, and depends on if you're
looking at a temporary or a permanent fix. Sealing your
bag barrier - say, with plastic sheeting - will require
some forethought about how you're going to deal with any
possible standing water issues.
In addition to dealing with water flow, another source of
concern is mud and debris flows. These can be disastrous -
not only because of their destructive weight, but because
they can precipitate a domino effect when they rush down a
slope that's already saturated. The best you can hope for
is prevention. If your check dams are successful at
catching them and retaining them, you're going to want to
clean them out after the storm.
Stabilizing
the
base:
People like to build roads, houses, and patios at the
base of hills and slopes, and tidy them up & maximize
the real estate by removing the wedge. Doing this,
however, weakens the slope - because the slope
exerts downsloping pressure (even if it's not actively "on
the move", or "creeping"), this is where the weight of the
slope is concentrated.
 A well-built retaining wall (toewall) at the base of the
slope should follow the
line (angle) of the slope as much as possible.
Where is the direction of force
coming from? The retaining wall should meet this,
and smoothly transfer the
downward weight of the slope. It should be wider
at its base, narrowing as it
rises, and lean solidly against the slope. Even
better would be excavating
the base of the slope and building the retaining
wall into it.
Sandbags are well-suited for this; they're
portable, easy to work with, and
can be solidly tamped into place. Again, strips of
4-point barbed wire can be
placed between the courses, locking the bags
together. Since UV rays tend to break the polypropylene
fabric down over time, it's a good idea to plaster or
stucco the bags after the wall is built.
Don't overlook the importance of dealing with drainage.
If hillside saturation is an issue, one approach
is "weep holes" in your wall - spaces between bags
every three feet or so, downward-sloping if possible.
While a polypropylene sandbag retaining wall won't
necessarily wick up water, failing to providing an outlet
for it as it backs up behind the bags can supersaturate
& weaken the surrounding soil. Or, if the soil behind
the bags is rich in clay, it can cause that soil to swell
& expand, pushing your bags out, ruining your wall at
the least and possibly resulting in total slope
failure.
Working
with sandbags:
Sandbags come in two basic materials. Burlap is subject
to rot and is attractive to insects and rodents.
Polypropylene is rip-proof and water resistant, but prone
to deterioration in the sun (our poly bags are treated
with 1600 hour UV inhibitors, which in New Mexico summers
gives them a life span of only a couple of months). Either
material will last longer if sealed with stucco or cement.
A basic earth plaster can be made on-site out of clay-rich
dirt, sand, and water (a little straw will give it
strength). On a summer day, it will bake in the sun and
may last for years with a little maintenance. If your
project is temporary, you can simply cover the bags with
tarps or shovel some dirt over them to keep the sun off.
It's not a bad idea to pick through or sift your dirt
before filling your sandbags, removing sharp twigs &
branches, as well as root balls and clusters (which can
sprout & burst through the bag). Bags are generally
filled 1/2 way, then tied off & laid horizontally. The
opening is folded under as the bag is laid, and the bag is
shaken to distribute the contents equally. A hand tamper
is then used to compact them. 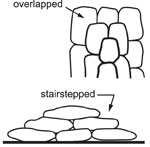
As they're being laid, the bags should be overlapped and
butted together (see image). If they're being subjected to
lateral force (such as a check dam), the basic rule of
thumb is that the base should be 3 times the height, which
calls for a pyramid construction.
Depending on your fill material, a standard sandbag (14"
x 26") will weigh about 25-30 lbs after being half filled.
This means that every 65 to 80 bags will give you a ton
(2,000 lbs) of reinforcement. One average person can
fill, tie off, place & tamp 20 bags per hour. Several
people, setting up a production line, can crank out 100 or
more bags per hour (see our bag
filler). If it's a big job, we can bring our sandbag
machine out to your site, which is capable of cranking out
over 800 bags per hour.
Burritos:
If you have the means to deploy them (they can be large
& heavy), you can construct what we call
"sandbag burritos". They're essentially quick-and-dirty
cylindrical gabions holding filled sandbags that take less
than 10 minutes to construct.
Roll out some 6-foot chain link fence, then cut out a
3-foot wide section. Next, lay a number of filled sandbags
on it (say, two vertical rows of 3 or 4 sandbags), then
roll it up & fasten the edges and the ends with hog
rings. Six 50-lb sandbags gives you a 300-lb, 6'L x 2'
round burrito. Eight 50-lb sandbags will give you 400 lbs.
Twelve 50# sandbags will give you 600 lbs. You get the
idea.
The chain link allows you to link the burritos together
after they're placed. Utilizing higher-quality
sandbags and/or covering the burritos with dirt (so
UV exposure doesn't cause the bags to disintegrate) will
help ensure long life. Even better might be to use our snake
bags.
Deploying burritos isn't always easy because of their
weight and because erosion sites tend to be steep, uneven
and unstable. Being cylindrical, they do roll off a steep
edge nicely; the trick is making them stop rolling where
you want them. Hooking up premeasured chain to them with a
solid belay before rolling them over the edge helps make
them stop where you want them; then hammering in a few
fence stakes below them will keep them put. If your
conditions call for them, they're easy, inexpensive, and
far more effective than just using individual sandbags. If
you like, we can supply them to you pre-assembled to your
specs; write or give us a call.
In many areas, you may need a permit to build retaining
walls. If you plan to file a claim with your property
insurance, you might have it rejected unless you had an
engineer or a licensed professional involved before
you built.
In times of disaster, bags can sometimes be acquired from
your local fire station or emergency response authorities
- but they may be limited in number (some have told us
that they've encountered limits of 10 to 20 bags per
household).
For farmers & ranchers, businesses, government &
tribal agencies, and anyone else, we can provide bags in
any quantity, from one to 100,000 (larger quantities need
to be pre-ordered). We don't stop at just selling them to
you - if necessary, we'll do whatever it takes to get your
bags to where you need them, and free you up to worry
about other things. Visit our shopping
page or contact us for prices & options.
For more in-depth information about controlling erosion,
you can download a 64-page USFS booklet here
(pdf). Also, we highly recommend An
Introduction to Erosion Control from the Quivira
Coalition in Santa Fe, available for download here
(also in pdf format).
Use this information at your own risk. No one
associated with New Mexico Dirtbags will have liability
for any loss, damage or injury resulting from the use of
any information, recommendations, or claims found on this
or any other page at this site. All information,
advice, suggestions and recommendations are offered in
"good faith". Likewise, New Mexico Dirtbags, its
principals and its employees, will in no way be held
liable for any loss, damage, or injury arising from the
use of any of the products sold or provided. Purchasers
and users of products, information, and advice made
available by New Mexico Dirtbags are hereby notified that
they are responsible for conducting their own research,
for taking all reasonable precautions, and for assuming
full responsibility.
|


